I have already written about the decision on moving to Unity3D in this post. Now it is time to go over all the main items of mobile game development with Unity. There are plenty of documentation, tutorials on how to make game development, I strongly recommend to take a look if you want to learn details of this beast. Here I am going to summarise our experience on creating real-time multiplayer board games on Unity.
As you can understand from the title, first point will be the Editor of Unity. It is very powerful by default and highly customizable. Which means it can even be more powerful in your hands.
I will not tell you about the details of the editor’s basic features. But I can easily say that, you will do almost everything (except coding) inside the editor. Configuring the game scene(s), attaching your codebase to game objects (characters, items, ui elements etc...), creating animations and setting input triggers, choosing preferences, integrating with version control system, preparing your project for a build. As I said almost everything :)
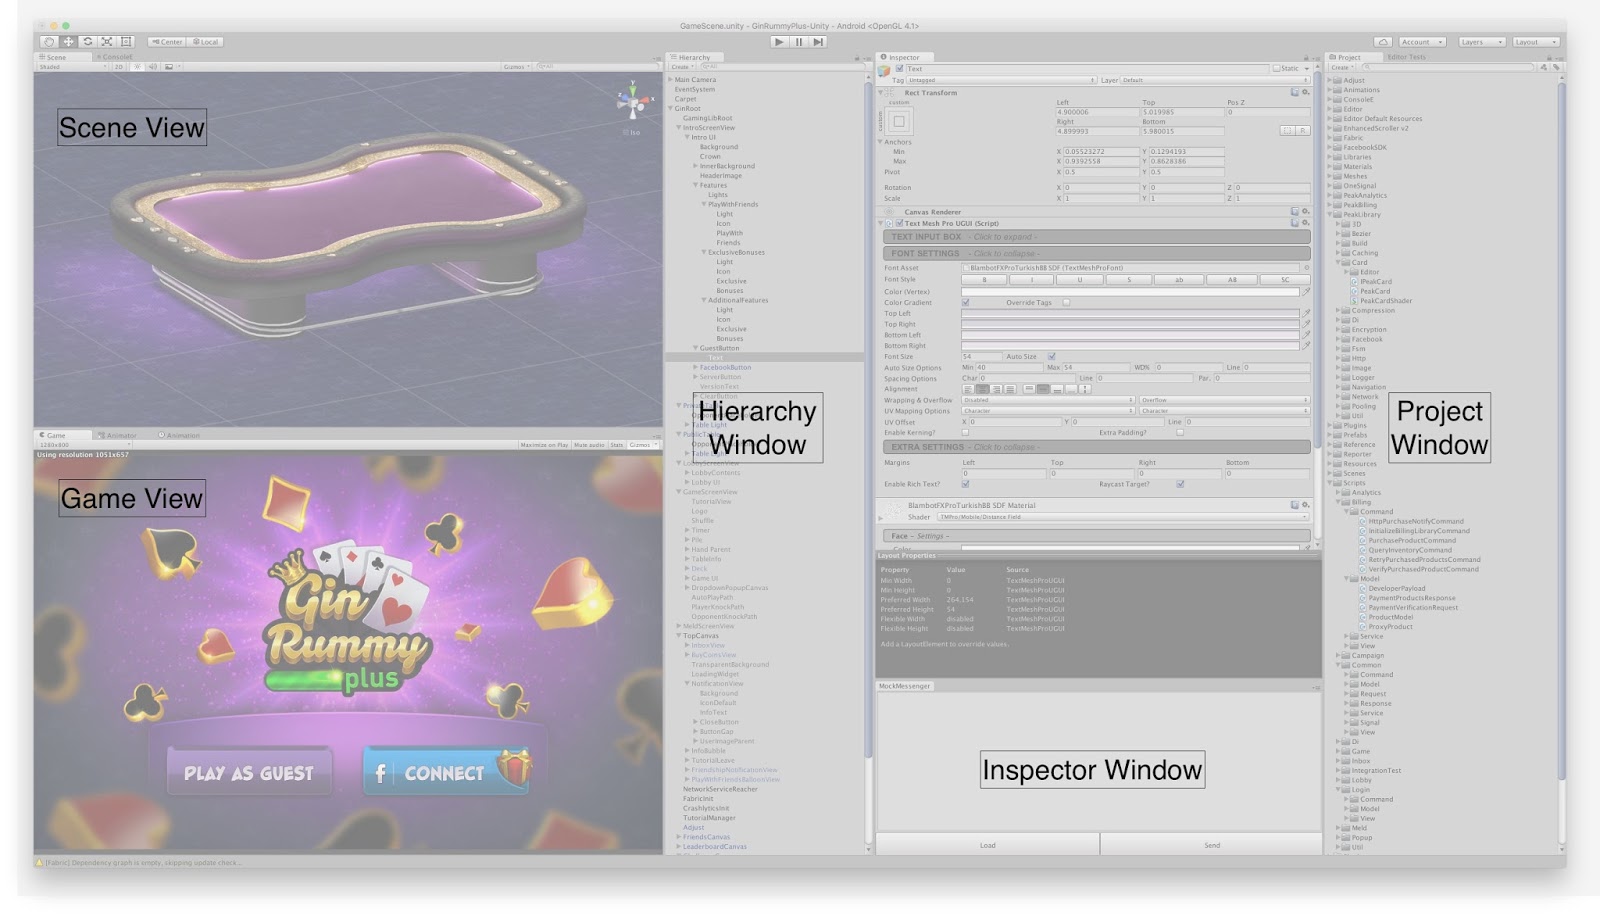 |
| Gin Rummy Plus under the hood :) |
The most common and useful windows are shown in my custom (not the default) positions above. This is the arrangement that I am using, it gives me practical access to the the most common windows. Actually I am not sure if there is a best practice on this, because even in our team almost each one of us using different arrangements. I guess we are going to find sweet spots soon :)
The Scene View allows you to visually navigate and edit your scene. The scene view can show a 3D or 2D perspective, depending on the type of project you are working on. Find out more about the Scene View. Actually I am using this section with The Console Window, because while running the game, I am looking either the scene or the logs.
The Game View is rendered from the Camera(s) in your game. It is representative of your final, published game. You will need to use one or more Cameras to control what the player actually sees when they are playing your game. Find out more about the Game View. Similarly I am sharing this section with The Animator Window.
The Hierarchy Window is a hierarchical text representation of every object in the scene. Each item in the scene has an entry in the hierarchy, so the two windows are inherently linked. The hierarchy reveals the structure of how objects are attached to one another. Find out more about the Hierarchy Window.
The Inspector Window allows you to view and edit all the properties of the currently selected object. Because different types of objects have different sets of properties, the layout and contents of the inspector window will vary. Find out more about the Inspector Window. I have another custom window (MockMessenger) here to replicate server socket messages to the game on runtime. I will tell more about custom windows soon.
The Project Window displays your library of assets that are available to use in your project. When you import assets into your project, they appear here. Find out more about the Project Window. And of course I am sharing this section with Unit Test Runner Window. (I will have a separate test section / post.)
The other very important thing about Editor is extending the editor. It is quite easy to customize the editor, and can be very useful. Unity lets you extend the editor with your own custom inspectors and editor windows and you can define how properties are displayed in the inspector. There are various types of customization that we have used in our games. I will give you a few simple ones:

Custom Menu Items
We have created a few functionality and put them under custom Peak Games menu item. That enables us to run those functionalities during runtime and/or development time. To show you how useful they are, let me tell you about three of them: Reconnect, Disconnect, Send To Background functions.
Since we are making realtime synchronous mobile games, it is very frequent to have connection drops, very quick reconnections or sending game to background because of a phone call or something. So it is inevitable to face these issues during the game play. Like other games, we have our own solutions, catch mechanism in different situations like this. But having the solution is not enough, it should be consistent and available on every part of the game. With these custom menu items we can simulate these issues on our games whenever we want on different scenarios and different parts of the game during the runtime (kind of a monkey test).

Custom Windows
Next is custom windows, you can create any number of custom editor windows for your game. These behave just like the Inspector, Scene or any other built-in ones. This is a great way to add a user interface to a sub-system for your game.
Again I will give a real example from our games. We have created a custom window MockMessenger, it is not that sophisticated but to the point. The purpose is replicate server socket messages to the game on runtime.
Like any other software project, we divide the projects into smaller features, and even more smaller tiny tasks. So while we are developing a feature or fixing a bug, we are working on a specific part of the game. And in our case, most of the time that part is highly integrated with server side. Instead of configuring a specific development server or a local server, we are using this window to send server messages to our game. With this window and the function underneath we can send a single message to our game like it is coming from the connected server.
Like any other software project, we divide the projects into smaller features, and even more smaller tiny tasks. So while we are developing a feature or fixing a bug, we are working on a specific part of the game. And in our case, most of the time that part is highly integrated with server side. Instead of configuring a specific development server or a local server, we are using this window to send server messages to our game. With this window and the function underneath we can send a single message to our game like it is coming from the connected server.
Like sending a single message, we can send multiple messages at once and save that scenario to a file and replay it over and over again. Even we can configure the exact receive times of those messages , so that we can mimic weird socket packages' receive times. As you know sometimes you can get multiple packages in a few milliseconds and wait for the next ones more than ten seconds.
Since socket connection is the fundamental part of our games, it is very crucial for us to replicate these situations very quickly and without big efforts. As you can guess we are using this window very frequently not just developing a new feature, but also simulating or reproducing a real issue. So with this simple window we gain a lot of time and effort.
 Customize Hierarchy Window

Other customization that we have done is to show additional information in the hierarchy window. It makes things easier to track during the game play. I guess you already got that we really love card games :)
In a card game, Card (class) is the main character of the game along with Hand, Deck and Pile of course. And it is very important for us to track a card object is enabled or disabled in the game play scene or the conceptual and physical location of the card like is it in the Hand, or is it in the Deck or Pile.
While playing the game, cards are moving between Deck, Hand and Pile. It would be very useful tracking the cards in the editor hierarchy window. For example, by looking at the hierarchy window I want to see the number of active cards which are children of deck or pile or hand. Actually my colleague has already explained this customization in detail.
These are very simple examples just to show you the main idea. You can create much more sophisticated customizations, for instance once we had developed a level editor inside the Unity for an experimental endless runner game.
As last word, it is your imagination and needs that would lead you to make editor customizations. The main idea is to ease and quicken the development of a Unity game.
Now let's write some code...
Now let's write some code...
1 yorum:
Play free spins slot pragmatic【WG】slots - CasinoRange 1xbet korean 1xbet korean fun88 fun88 766Hot Sauce | 벳토사이트 추천 세다 벳사이트
Yorum Gönder